
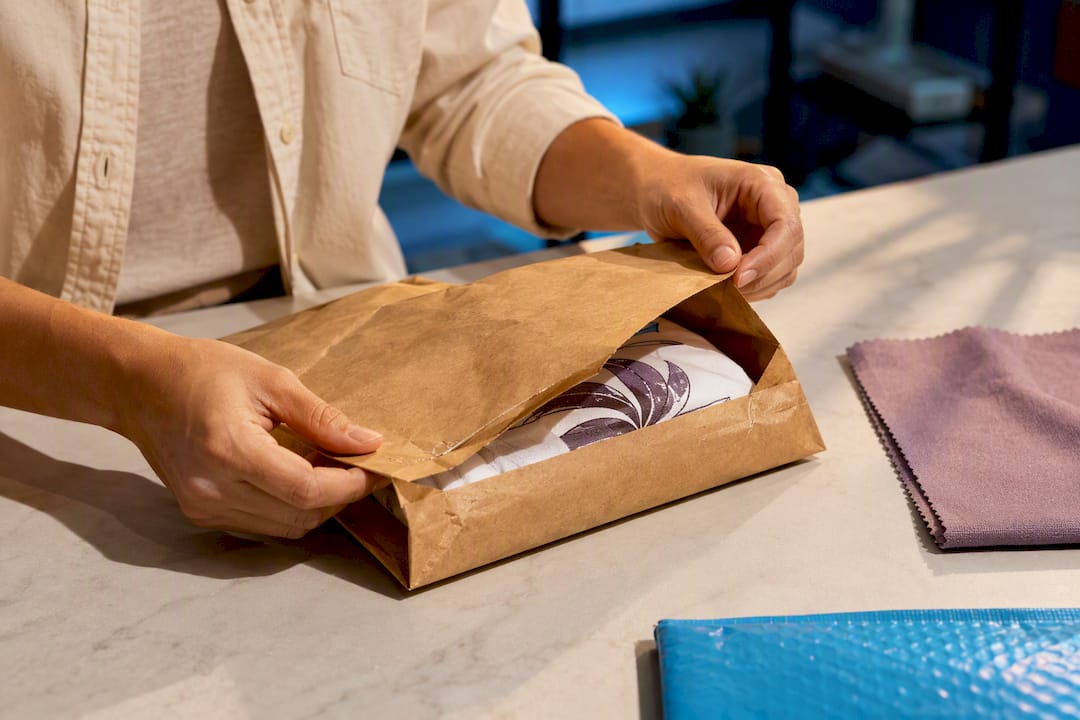
Launch a Print on Demand Shop in 90 Days, Test 20–30 Designs
Print on demand lets you sell custom designs on products a supplier prints, packs, and ships only after a customer orders, so you never touch inventory or upfront stock costs. It suits anyone starting with little cash who wants to test an idea before committing real money. Your next move: pick one narrow niche, choose a single product, and list it this week.
TL;DR:Most beginners should focus on testing a single niche and product, like mugs or stickers, with only two to three SKUs to avoid spreading effort too thin.Validating a niche involves checking keyword search volume, listing saturation, and reviews to identify demand and gaps before designing or listing products.Starting on a marketplace like Etsy provides more immediate traffic, but a supplier with U.S. fulfillment and quality samples are critical for maintaining customer satisfaction.Designing simple, bold text-based graphics that speak directly to your niche, along with lifestyle mockups, significantly improves listing conversions.Expect to spend around $50 to $150 at launch for samples, mockup tools, and basic design software, with margins generally ranging from $15 to $30 per product.
Freedom After 45Build Income Around Two HoursFreedom After 45 shares a step-by-step 2-Hour Workflow for women over 45 seeking recurring income without traditional barriers to entry.Explore the 2-Hour Workflow
Table of Contents
- What Is Print on Demand for Beginners, and Is It Worth Starting?
- How Does the Order-to-Fulfillment Process Actually Work?
- What Should You Sell First as a Beginner?
- How Do You Pick and Validate a Niche Before Designing Anything?
- Where Should You Sell, and How Do You Choose a Print Supplier?
- What Design and Mockup Choices Actually Move the Needle?
- What Should You Budget for Startup Costs and Pricing?
- What’s the Fastest Path to Your First Sales?
- What Does a 30 to 90 Day Launch Checklist Look Like?
- Do You Need a Business License and Sales Tax Permit to Sell Print on Demand?
- Publisher Perspective: Applying the 2-Hour Workflow to Print on Demand
- Want a Faster, Guided Path Than Figuring This Out Alone?
- Sources
What Is Print on Demand for Beginners, and Is It Worth Starting?
Print on demand works like this: you upload a design to a product listing, a customer buys it, and a third-party supplier prints and ships that specific item directly to them. You never hold stock, prepay for inventory, or pack a single box. That order-to-door structure is what makes the model attractive to anyone testing a business idea without a warehouse or a loan.
It is genuinely low-risk, but “low-risk” doesn’t mean “easy.” Here’s the honest tradeoff sheet before you commit a weekend to it.
The upside:
- Zero inventory cost. You pay production fees only after a customer pays you first.
- Fast to launch. A single listing can go live in under an hour once you have a design and a supplier connected.
- Easy to test ideas. You can try ten niches in a month without touching a credit card beyond sample orders.
The downside:
- Margins run thin. Production costs eat into retail price more than most beginners expect.
- You don’t control quality directly. A supplier’s print misfire becomes your customer service problem.
- Competition is dense on marketplaces, so a mediocre design in a crowded niche gets buried fast.
Set your timeline expectations now: most sellers who treat print-on-demand as paid tuition plan on 60 days before their first real sale pattern emerges, and longer before they find a design that actually sells repeatedly. That’s not a failure signal. It’s the normal shape of the learning curve.
How Does the Order-to-Fulfillment Process Actually Work?
Here’s the mechanical flow, start to finish. A customer finds your listing, buys it, and your platform sends that order automatically to your print supplier through an integration (Printful, Printify, and similar apps handle this without you lifting a finger). The supplier prints the design onto the physical product, packs it, and ships it under your branding, or sometimes under no branding at all depending on the plan.
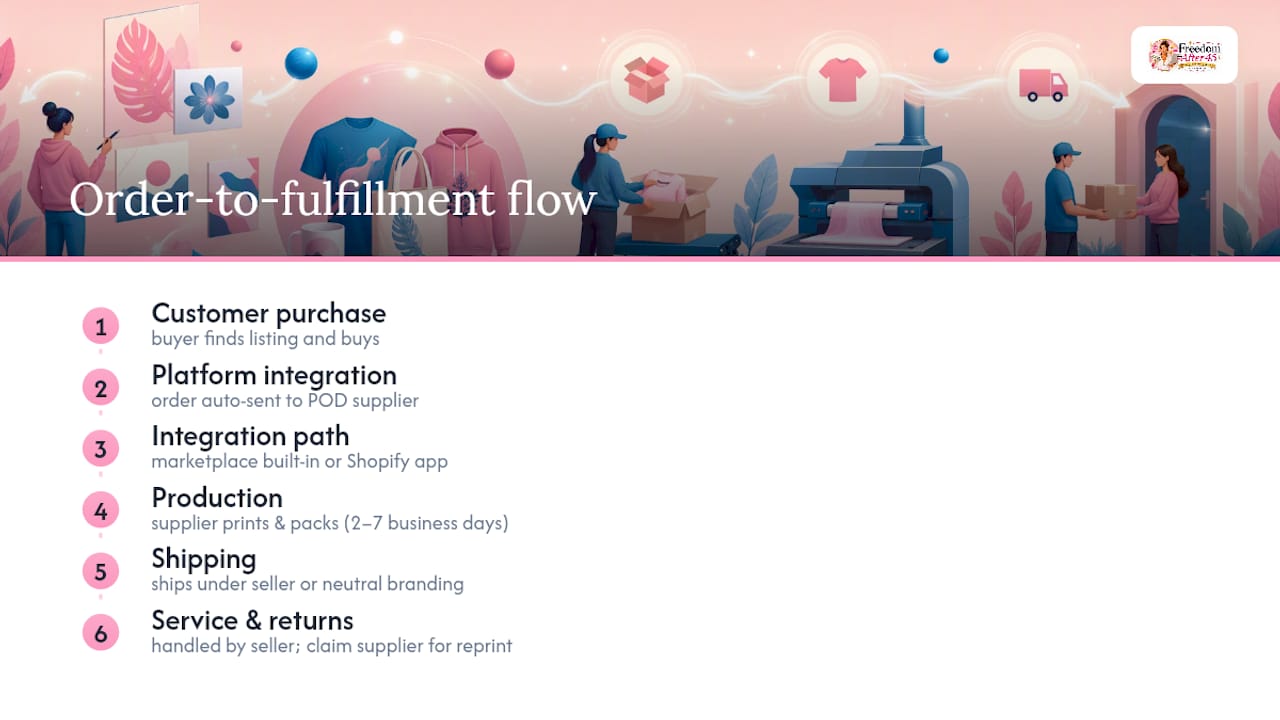
Two integration paths exist. If you sell on a marketplace like Etsy, Redbubble, or TeePublic, the platform often has its own built-in fulfillment network, so you barely touch a third-party app. If you run your own Shopify store, you connect a separate POD app that syncs your listings, inventory, and order data automatically.
Where things actually break: shipping speed and returns. Fulfillment can range from 2 to 7 business days for production alone, before transit time even starts, and that variance is exactly what triggers most negative reviews. If a customer expects Amazon-speed shipping and gets a 10-day wait, that’s on you to explain up front in your listing, not something to apologize for after the fact.
Customer service also sits with you, not the supplier. If a shirt arrives with a blurry print, your customer emails your store, not Printful. You then file a claim with the supplier for a reprint or refund. Budget time for this. It’s a small percentage of orders, but it’s a real part of running the business, not an edge case you can ignore.
What Should You Sell First as a Beginner?
Pick something simple to produce and easy to photograph well, and resist the urge to launch fifteen product types at once.
- T-shirts and hoodies. The most searched category, but also the most saturated. Sizing charts, fabric weight, and return rates (customers argue about fit more than any other product) all add friction.
- Mugs. Cheap to produce, low shipping weight, and rarely returned since there’s no sizing issue. A solid low-risk starter product.
- Stickers. Extremely cheap to produce, tiny shipping cost, and almost zero return complaints. Great for testing a niche’s demand before you invest in apparel mockups.
- Posters and wall art. Higher price point, but shipping weight and packaging (tubes, rigid mailers) get more expensive and fragile in transit.
The practical move is to start with two or three SKUs, not a full catalog. A mug and a sticker in the same niche, for instance, let you test the same design across two price points without doubling your workload. Once one product shows traction, you expand. Trying to launch a full product line on day one is the single fastest way to burn time on designs nobody wants.
How Do You Pick and Validate a Niche Before Designing Anything?
A niche isn’t just a topic. It’s an audience, a specific situation that audience is in, and the insider vocabulary that audience uses to talk about it. “Dog lovers” is not a niche. “Retired golden retriever foster moms who joke about fur on everything” is closer. The biggest beginner mistake is designing before validating the idea, so treat validation as the actual work and design as the reward after.
Here’s a repeatable framework you can run in under an hour:
- Spot-check keywords. Search your niche phrase on Etsy and Google. If autocomplete suggests specific, related terms (not just broader ones), there’s active search volume worth targeting.
- Check listing saturation. Search that exact phrase and count how many listings already exist. A handful of results with mediocre mockups is a green light. Thousands of near-identical designs is a warning.
- Sample the top results’ thumbnails and prices. If the top-selling listings look outdated, poorly designed, or overpriced for what they offer, that’s room for you to do better.
- Read the reviews on competing listings. Complaints about fit, print quality, or slow shipping tell you exactly what to fix in your own listing.
Watch for two red flags before you commit. First, an audience so broad it has no shared vocabulary (“cat people” versus “colicky-kitten foster parents”) won’t convert well because your design can’t speak to anyone specifically. Second, avoid any phrase tied to a trademarked name, sports team, or copyrighted character. That’s an instant takedown risk, not a shortcut to traffic.
Pro Tip: Screenshot five competing listings in your niche before you design anything. If you can’t tell them apart at a glance, your design needs to say something specific those five don’t.
Where Should You Sell, and How Do You Choose a Print Supplier?
The decision between a marketplace and your own store comes down to one question: do you need traffic, or do you need control? Marketplaces like Etsy, Redbubble, and TeePublic hand you built-in search traffic from day one, which is exactly what a beginner with zero followers and zero ad budget needs. A standalone Shopify store gives you full brand control and better margins long-term, but you have to generate every visitor yourself through ads, social, or SEO you build from scratch.
For a true beginner, marketplace-first is the more realistic starting point. You can always migrate proven designs to your own store once you know what sells.
Choosing a supplier matters just as much as choosing a platform. Run through this checklist before connecting anything:
- Catalog breadth. Does the supplier offer the specific products you want to sell, in the sizes and colors your niche expects?
- Print quality and method. Direct-to-garment, sublimation, and embroidery all look and feel different. Match the method to your design style.
- Fulfillment locations. A supplier with U.S.-based facilities usually means faster shipping to U.S. customers than one printing overseas.
- Sample availability. Ordering samples before launch is non-negotiable. You need to see and touch the actual print, not just trust a product mockup image.
- Integration ease. Confirm the supplier connects cleanly with your chosen platform without manual order entry.
Order a sample of anything you plan to sell and verify print quality and fit before finalizing product descriptions.
What Design and Mockup Choices Actually Move the Needle?
Your design needs to work at thumbnail size, because that’s the only size most shoppers ever see before they click. Type-led designs (bold, readable text with a punchy phrase) tend to outperform intricate illustrations for exactly this reason. If a design looks like a smudge at 200 pixels wide, it won’t get the click, no matter how good it looks full-size.
Speak your niche’s language directly. A phrase that sounds like an inside joke to your specific audience will always beat a generic sentiment that could apply to anyone.
Mockups matter more than most beginners assume. Lifestyle mockups, meaning a real-looking photo of a person wearing or using your product rather than a flat image on a white background, convert roughly 2 to 4 times better than flat mockups. That gap is large enough that fixing your mockups before you spend a dollar on ads is the smarter sequence.
Here’s how the mockup options stack up on cost versus payoff:
- Placeit or similar mockup generators. Cheapest option, fast, decent quality. A reasonable starting point for your first batch of listings.
- A Fiverr photographer with real models. Costs more per shoot but produces genuinely differentiated images your competitors likely don’t have.
- Custom photo shoots. Highest cost and highest ceiling, worth it once a design proves itself and you’re ready to scale that specific winner.
Pro Tip: Don’t design one shirt and call it a launch. Ship 20 to 30 designs across your niche in the first month, expect two or three of them to become your real winners, and let the sales data tell you which ones to double down on instead of guessing.
What Should You Budget for Startup Costs and Pricing?
Plan on roughly $50 to $150 to get started. That covers a handful of product samples, a basic mockup tool subscription, and maybe a small design software fee if you’re not using free tools. It does not require inventory, a storefront lease, or a manufacturing minimum order.
Production costs and suggested retail pricing vary by product, and knowing both numbers before you list anything keeps you from pricing yourself into a loss:
| Product | Typical Production Cost | Suggested Retail Range |
|---|---|---|
| T-shirt | $11–15 | $30 |
| Hoodie | (higher than t-shirt) | $50 |
| Mug | (lower than apparel) | $15 to $30 |
Those retail bands leave you a workable margin after production and platform fees, but they assume a reasonably competitive niche. Underpricing to “compete on cost” in a crowded category rarely wins. Shoppers buying a novelty mug or a niche shirt aren’t comparison-shopping on price the way they would for a commodity item. They’re buying because the design speaks to them specifically.
Ordering a sample isn’t optional spending you can skip to save money. It’s the only way to catch a blurry print, a color mismatch, or a garment that runs small before a customer catches it for you in a one-star review. Treat that $15 to $30 sample cost as insurance, not overhead.
What’s the Fastest Path to Your First Sales?
Getting your first sale usually comes down to sequencing, not luck. Here’s the order that gets results fastest with the least wasted effort:
- Nail your Etsy SEO fundamentals first if you’re on a marketplace. Titles, tags, and descriptions built around the exact search phrases your niche uses matter more than any paid traffic early on. Expect 4 to 8 weeks for a new listing to settle into its ranking, since Etsy runs new listings through a sandbox period. Resist the urge to edit your listing daily during this window. It resets the clock more than it helps.
- Drive purchase-intent traffic through Pinterest. Pinterest functions more like a visual search engine than a social feed, and users there are actively looking for products, not just scrolling for entertainment. Pin your lifestyle mockups with keyword-rich descriptions tied to your niche.
- Test paid ads only after you have organic signal. Once a listing shows even a handful of organic sales or a healthy click-through rate, put $5 to $10 a day behind it for a short test window. If it doesn’t produce at least a few clicks worth watching within that window, pause it and put the budget toward a different listing instead of doubling down on a design nobody wants.
The pattern to watch for is signal versus noise. One sale in a week could be a fluke. Three sales of the same design across two weeks is a pattern worth feeding more design variations and ad budget into.
What Does a 30 to 90 Day Launch Checklist Look Like?
Overwhelm kills more print-on-demand starts than bad design does. Here’s the order of operations that keeps the first quarter manageable.
Before you launch (days 1 to 14):
- Validate your niche using the keyword and saturation checks covered above.
- Order samples from your chosen supplier and inspect print quality and fit.
- Build 10 to 20 listings around your validated niche, not just one.
- Source or shoot lifestyle mockups for every listing before it goes live.
- Finalize your listing keywords and titles using the language your niche actually searches.
Launch week (days 15 to 21): 6. Publish all listings within the same short window so your shop doesn’t look abandoned to a new visitor. 7. Pin 5 to 10 of your best mockup images to Pinterest with keyword-rich descriptions. 8. Run a small ad test on whichever one or two listings already show the strongest organic click activity. 9. Set up an email capture (a simple discount popup or a follow link) so first-time visitors aren’t a one-time interaction.
First 90 days (weeks 4 through 12): 10. Track which listings get views, favorites, and actual sales, not just traffic. 11. Double down on your two or three winners with new color variants or related designs in the same niche. 12. Hold off expanding into new product categories until at least one design has proven itself with repeat sales. 13. Revisit your Etsy SEO only after the sandbox period has fully passed, and adjust based on real search performance, not guesswork.
That sequence keeps you from the two most common beginner traps: launching a single design and waiting, or launching fifty designs with no data to tell you which ones matter.
Do You Need a Business License and Sales Tax Permit to Sell Print on Demand?
Yes, in almost every case. Even though print-on-demand feels like a side hustle you run from a laptop, U.S. sellers generally need a general business license from their city or county and a sales tax permit from their state’s revenue department, even when the entire operation runs online with no physical storefront.
The specifics vary by state and locality, so the exact fee and application process depends on where you live and operate the business from. Some cities require a home occupation permit if you’re running the business out of your residence, on top of the general business license. Your state’s sales tax permit is what allows you to legally collect sales tax from customers in states where you have a tax obligation, and most marketplace platforms like Etsy actually calculate and remit that tax on your behalf automatically, which simplifies your part of the process considerably.
None of this requires forming an LLC on day one. Plenty of beginners start as a sole proprietor using their own name and Social Security number for tax purposes, then formalize into an LLC once the business proves itself and the liability protection becomes worth the paperwork. What you shouldn’t skip, regardless of business structure, is checking your specific city and state requirements before your first sale, not after. A quick call to your local city clerk’s office or a search on your state’s Secretary of State website usually clarifies exactly what applies to you.
Publisher Perspective: Applying the 2-Hour Workflow to Print on Demand
Every step in this guide, from niche validation to your first ad test, fits inside a focused two-hour block if you sequence it deliberately instead of trying to do everything at once.
Spend one session validating a niche. Spend the next building listings. Spend a third sourcing mockups. The print-on-demand model rewards patience and iteration over speed, and a consistent two-hour habit gets you through the checklist above without the overwhelm that causes most beginners to quit in week three.
— Freedom After 45
Want a Faster, Guided Path Than Figuring This Out Alone?
Everything above works, but doing it entirely solo means a lot of trial, error, and guessing which niche, product, or ad test is worth your limited time. Freedom After 45 built the 2-Hour Workflow specifically for that gap: a step-by-step blueprint that trims the guesswork out of starting an online income stream in short, focused daily sessions rather than a chaotic learning curve stretched across months.

The program includes video walkthroughs, downloadable templates, real case studies from women who started with no existing audience or product, and access to a community for support when you hit a snag. It maps directly onto the launch checklist covered earlier: the same validation, listing, and testing steps, just with a clearer sequence and less second-guessing at each stage. It’s built specifically for women over 45 who want a structured, low-barrier way to build recurring income without needing a following, a product idea, or hours of free time every day. If that sounds like the shortcut you’ve been looking for, see how the 2-Hour Workflow works and decide if it’s the right next step for you.